TUTORIAL: Badass Budget Battlemats
WHAT WE WILL BE MAKING
Welcome! We’re going to be making a canvas and latex acrylic caulking battlemat!
These instructions will specifically be tailored to creating a single piece, 6’x3’ battlemat for use with Star Wars: Legion, but this process can be used for all kinds of games and uses!

The mat will have a textured surface, be flexible, and rollable (for easy storage and portability)! I do not recommend folding this mat, it will keep much nicer if it is rolled up when stored. The mat will also be nice and hefty, so it won’t slide around easily when used. You can also give it all kind of different textures (sky’s the limit), so you can apply this same methodology to tons of different styles/games.
This is not an original idea of mine, but I’ve refined it over numerous attempts and am happy to share all of the tips and tricks I’ve learned along the way.
Benefits:
- Portable
- Custom match color to your terrain, or vice versa
- 3D realistically textured surface
- Complete artistic control
- Long lasting, hefty
- Materials needed are pretty dang cheap
Total estimated labor time: 3-5 hours
Total time to completion: 3-5 days depending on dry/cure times.


OVERVIEW OF STEPS
Here’s an overview of the steps we will be taking to make the mat so you can see what’s coming:
- Prep the canvas
- Prep work area
- Apply first coat of caulk, let cure
- Apply second coat of caulk, let cure
- Apply third coat of caulk and texturize the mat, let cure
- Paint the mat
- Cut the mat
- Enjoy the mat
WHAT YOU WILL NEED
In order to complete this project you will need the following tools and materials:- A decently well-ventilated space you can occupy for 3-5 days
- A caulking gun
- 8 x 10.1oz tubes of Acrylic Latex Caulk
- Ensure it is ONLY Acrylic Latex and does not contain silicone (I have not tried the siliconized variants, but my guess is our acrylic paint won’t stick as well to it- if you try it, let me know if it works!)
- A blade or clippers to cut ends off of caulk tubes (some caulk guns have a clipper in the handle)
- Paint (1-2 cans of spray paint or quite a few acrylic 2oz bottles) (we’re going for distance here, not quality)
- Canvas cloth (larger than 6’x3’) (we’ll be using a hardware store drop cloth)
- Plastic drop cloth (the same size as your canvas or bigger)
- Some large, cheap painting brushes (for large areas of drybrushing, not for painting walls in a house)
- Cheap, plastic drywall spatulas (only one is needed)
- A 6’x3’ table or section of empty floor (That you are okay not using for 3-4 days)
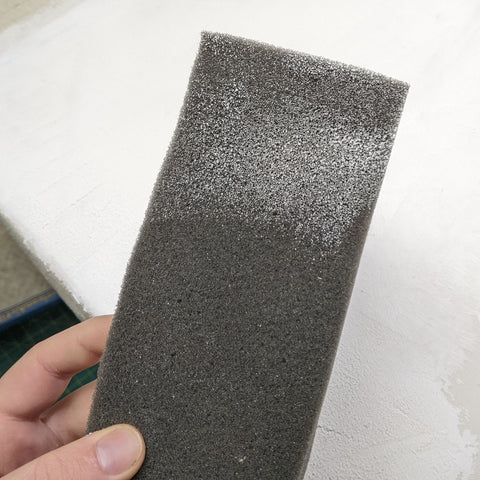
- Typical kitchen sponge or other similar textured items
- Scissors (or rotary cutter)
- Pen or Fine-tipped sharpie
- Yard stick, tape-measure, and/or drafting square (for marking and cutting the mat to exactly 6’x3’ once completed).
- Any of these will work, you’re really just looking for a long straight edge, a method of measurement, and something square to ensure your corners are 90 degrees.


Scissors, some straight edges, and pens/sharpies for cutting the finished mat to the perfect size.

Plastic drop cloth for protecting our work surface, whether its a table or a floor. 
Standard kitchen sponges, my favorite method for adding texture. (The left one with bigger pores is perfect)
A QUICK TIP ON BUYING ACRYLIC LATEX CAULKING
Not all acrylic latex caulk is made the same! DAP’s cheapest stuff sets in 24 hours and is the ideal caulking for this project! I’ve also found it to be the most difficult to find since housing contractors use it all the time.
WHAT YOU MIGHT WANT
These will make your life easier, but are not necessary:
- Clamps for holding down your cloth during the caulking process (highly recommended to make applying the caulk much easier, otherwise the cloth can bunch up or pull when trying to apply the caulk evenly)
- Large tube for storing mat when not in use (there are tons of methods for storing mats, I’ve found rolling it up and storing it vertically [standing upright in the tube] to be the best method for storing that puts the least amount of fatigue on the mat)
- An apron or grubby clothes; as with any project, things can get messy quick!

THE DROP CLOTH
First we’re going to prep the canvas drop cloth.
This large sheet of fabric will both be canvas (because it is a cheap material and easy to find) and BE our canvas (because we will be painting and sculpting on it!). Canvas is sturdy, tough, and a decently heavyweight fabric. It will serve as the perfect backdrop for our mat.
I bought a larger canvas drop cloth at the hardware store. The toughest part about this process is finding one without a large seam going through the middle. Some drop cloths have them, others do not, and some may or may not have them depending on how that particular cloth was manufactured that day at the factory- it seems random. And for the normal purposes of its use (getting messed up and grubby with paint) that is a perfectly normal flaw for it to have. What we’re looking for is at least a 6’x4’ section of cloth that is uninterrupted by large bulky seams.
The best method I found to get these large uninterrupted sections of cloth is to buy a much larger drop cloth that I KNOW has seams and plan for it. This also works out to be the cheapest way to get fabric for multiple mats, if you have plans for that. The drop cloth that I bought was enough fabric to make SIX 7.5’x4’ pieces and was around $30 USD! That’s only $5 USD per mat, plus approximately $10-15 USD for the acrylic latex caulking. [Biggest downside here is if you only want one mat, you end up with material for six. Perhaps you can split it with a buddy?]
You can also get canvas cloth from the fabric store, just be sure it is wider than 3 feet and a little longer than 6’. You CAN work from a perfectly sized piece, but the process will be more difficult as you can’t clamp it down to hold it in place while working. Also, buying canvas elsewhere will be more expensive.


SETTING UP THE WORK AREA
Now we need to prep our work area.
Be as messy as you want, but here’s what I’ve done to help me have a clean, orderly, and less-stressful time with this process:
- Lay down a plastic drop cloth over your work surface
- Lay your piece of canvas over your work surface
- If you have clamps and are using a table, clamp your canvas and plastic to the table, taking care to stretch the canvas decently tight so that it won’t bunch up or move when you start applying caulking to it.
- If you want, you can trace out a 6’x3’ rectangle in pencil, pen, or fine-tipped sharpie at this point. NOTE: I can confirm the sharpie will show through the semi-transparent caulking. If you want to leave your mat white (for snow), please keep this in mind.
- Grab your caulk gun and 3 tubes of caulk, you’re ready for the next step!


THE FIRST LAYER & OVERALL TECHNIQUE
We’ll be coating the mat in 3 layers total, so let’s get to it!
We’re going to mentally break up the mat size into 6 equal shapes roughly 2’x1.5’ in size and work clockwise. The latex caulking will dry pretty quick, so we will work quickly but calmly on each of the 6 sections in order.
- Load your caulk gun up with a tube of acrylic latex caulk (cut the tip off) and grab your spatula.
- Choose a corner section to start and put some beads of caulking on the canvas. (It’s okay if you overdo it). Aim to use about half the tube of caulking per 1/6th section.
-
In a sort of sweeping motion, drag the spatula along the canvas and caulking to create a smooth, uniform layer.
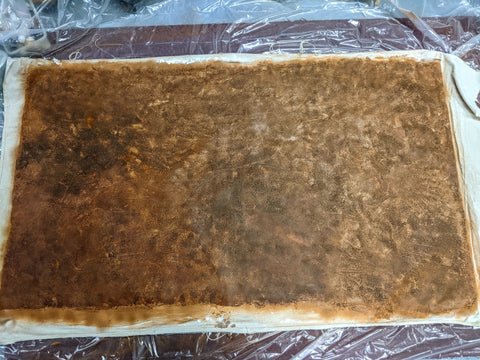
- NOTE: You want to cover MORE than the 6’x3’ section so that we can cut it down to the proper size later. If you traced out the box on the canvas earlier, just simply work past the lines an inch or so wherever possible.
- This first layer will not be bright white in color because right now we are simply smooshing it into the canvas to bind them together and create a work surface for the rest of the project.
- This technique will take some practice at first, and it’s okay if the first (or second) layer is nowhere near perfect. Just do your best and have fun!
- Applying more pressure with the spatula will result in thinner layer, less pressure will be a thicker layer. The angle of the spatula will affect performance too- it just takes a little practice to sort it out.
- Once you’ve covered 1/6th of the mat, beginning working your way around the mat; doing your best to keep even coverage throughout.
-
Once the entire mat is covered and adequately smoothed, let it cure for 24 hours. (Cure time will depend on what caulk you purchased! Be sure to read the label!)
- It can get kind of smelly, so open a window if possible.


"HELP! I MADE A MESS AND GOT SOME ON MY SHIRT!"
Don’t panic! If you’re using the right acrylic latex caulking, it’s water soluble and will come right out of clothes with a little bit of work! Messy people, unite!
THE SECOND LAYER & WHAT TO LOOK FOR
One down, two to go!
After 24 hours have passed, check the mat to make sure it is dry and solid to the touch. The color will not be quite as bright of a white at this point.
Our second pass will be identical to the first- same amount of caulking per 1/6th section and the exact same process.
During this stage your focus should be on even coverage. If there are spots that didn’t get covered super well during the first layer, now is the time to slop on a little bit more to even it out!
NOTE: Remember that you want to cover MORE than the 6’x3’ section so that we can cut it down to the proper size later. If you traced out the box on the canvas earlier, just simply work past the lines an inch or so wherever possible.
Once you’re done with the second layer, let it sit until it is fully cured before starting the third layer!

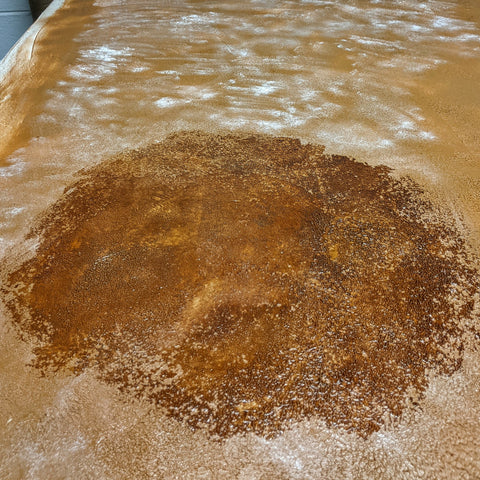
THE THIRD LAYER & APPLYING A TEXTURE
Float like a butterfly, sting like a bee! The last layer’s best, let’s do layer three!
Finally, we’ve come to the good stuff- the texture layer! You’ll only need 2 tubes of caulking this time around because we only need it to add texture to our mat. That will give you approximately 1 tube per half- so keep that in mind as you work!
THE OVERALL PROCESS
To texture the mat we are going to glop on some caulking and spread it around a little thinner than before. Once we’ve got 1/6th of the mat covered, we’ll come in with a textured object and lightly (or firmly) press it into the wet caulking to texture it! Leave it to fully cure without touching it and we’ll be left with a wonderful, flexible, durable, and paintable surface!
If you’re going for an organic texture (soil, desert, snow, etc.), you’ll be working quick and chaotically to overlap shapes and blend your surface sculpting evenly.
WORKING QUICKLY
The caulking can dry pretty quick (depending on humidity/temp) such that it won’t take a texture, so you’ll have to work quick. This is actually a good thing, as the speed needed can help you to achieve a nice random and seamless texture.
CHOOSING A TEXTURED OBJECT
There are loads of interesting items you can use- here are some ideas: a lightly damp sponge, a lightly damp foam bit, a scrunched plastic bag, some crumpled aluminum foil, a rock from the outside world.
You can also very lightly drag the spatula across the caulking to create interesting areas of “damage” to contrast the otherwise more uniform texture.
TIPS AND TECHNIQUES
- Relax and have fun! This is the cool part!
- Practice near or off the edge of the mat before doing the entire thing to build confidence in your approach and technique.
- Smooth out your caulking before applying a texture with the spatula so you can easily see what you’ve done and what youve missed.
- If the texture gets weird, don’t be afraid to smooth it out again and start over. You can also always add a 4th layer of touchups after this layer, too.
- If the texture is too spikey looking, your 3rd layer of caulking is likely too thick. Trying smoothing it down with the spatula so it’s a little thinner and try again.
- Adding some water to any foam/sponge can help it not stick as much, but keep it minimal.
- Work fast and randomly if you’re going for an organic look (desert/soil/snow).
- We’re not looking for a perfect stamping process, we’re looking for overlapping shapes and general chaos. Nature isn’t perfect and neither are we; yay, imperfection!
- Reminder to relax and not let the project get the best of you! Any mistakes can be scrubbed, redone, or left to serve as interesting blemishes and marks.


PAINTING THE MAT

Colors are what really bring this project to life!
There are surely hundreds of different methods, approaches, and ideas about how to paint terrain and even more processes on achieving different looks. So, first and foremost I recommend
MY PERSONAL APPROACH
I’ve made 3 mats so far and I’ve found the easiest, most natural, and most cost effective method to paint these is to use a standard can of spray paint as a basecoat followed by a series of drybrush colors or washes. Drybrushing and washes are typical mini-painting techniques that I won’t explain here in detail, but there are numerous articles on both across the web.
The basecoat color can be tricky to decide on, so taking inspiration from real life is the best bet. Here are a few of my general recipes:
For a desert look I chose a light, yellowy-warm sandy-tan color and then drybrushed several darker colors on to the crests and raised textures of the mat. Mostly deeper caramel tans, browns, navy blues, and grayed-out blue-greens. (I’ve included pictures of this particular paint-up in the tutorial!)
For a Martian look I chose a midtone caramel-orange color as my base. I then drybrushed a lighter tan color very lightly across the mat. Finally, I gave the entire mat a wash that I mixed myself from orange, brown, and black acrylic inks. This one was an ongoing experiment and I welcomed oddities and failures as unique terrain blemishes.
For a fresh snowy look I did… nothing! I simply left it as is. The only thing I may yet do is give it a flat white coat of paint to cover up any blemishes or marks that I don’t like on it.
TIPS AND TECHNIQUES
- Be nice to yourself and use as large and as grubby of a brush as you can when drybrushing. 6’x3’ is a huge surface area compared to miniatures or even small terrain pieces and can take a long time!
- Extend past the 6’x3’ edge! Creating a natural pattern is easier if you’re not coloring in the lines. That’s why we cut it out last! So be messy and have fun!
- Embrace happy accidents! Organic = random/chaotic! Don’t fret too much about something looking a little out of place or too dark as you work on painting the entire mat. Leave any mistakes behind until you’ve painted the whole mat and can look at it all at once. You may like that interesting pool of wash or that lighter spot from some heavy drybrushing!
- Consider the terrain you’ll be putting on this mat and what colors those objects are currently. Maybe you want to color match the set of rocks you painted last month! Maybe that OTHER set of rocks you painted would also work with the color tone of this mat!
- Consider future terrain you may put on this mat! Maybe buy an extra spray paint can so you can breeze through all of those buildings that are built from the same clay as this planet!
- Grab a buddy, child, or significant other to help out! It goes SOOO much quicker with a friend- especially someone you may share memories with when playing in the future!
- Depending on the paint you used, consider spraying the mat with a flat/matte clear coat to seal and protect it, while also knocking down any residual shine.


CUTTING THE MAT TO SIZE
You’ve bled, sweat, and painted- time to release the beast!
Everything boils down to this! Time to push up your glasses and pop in those cyborg measurement eyeballs- we’re going for a near perfect 6’x3’ rectangle.
Oh, and you don’t need to worry about finishing the edges if you get a clean cut! The caulking sort of fuses everything together and it looks really clean!
- Grab your measurement tools, straight edges, pen/sharpie, and scissors!
- First, if possible, snip at a bit of the mat that got all three layers but is DEFINITELY outside of the 6’x3’ area. We want to make sure your scissors can provide a clean, confident cut before using them along the entire mat edge.
- Measure your mat to ensure that a 6’x3’ rectangle will indeed still fit within the textured and painted section. (This is why we always worked outside the lines!)
- Draw a perfect, large 6'x'3’ rectangle on your pristine mat so you can follow it when you cut with scissors.
- I know this sounds daunting, but it’s not so bad!
- Start by drawing a long 6’ straight edge on one side of the mat.
- If you have a square/compass you can use it now to ensure your corners are 90 degrees. If not, find an object in your house that you are very confident is nearly perfect. A sheet of printer paper is a good one!
- Use your 90 degree tool to help you confidently draw your corners and extend them out to 3’ long.
- Use your 90 degree tool again on both ends to help you confidently connect your other 6’ long line.
- Double check that each corner is as perfect as possible (you want a rectangle, not a parallelogram).
- Carefully follow along the thin lines you have drawn on your mat with aa pair of scissors or rotary cutting tool. Keep the line on the outside of the cut so that any remaining black marks are removed rather than kept.
- REJOICE!
- Enjoy your new mat!
- (You can hold on to the scraps if desired to test painting applications and ideas for future mats!)


ENJOYING & STORING YOUR NEW MAT
PHEW! You’re done! How exciting!
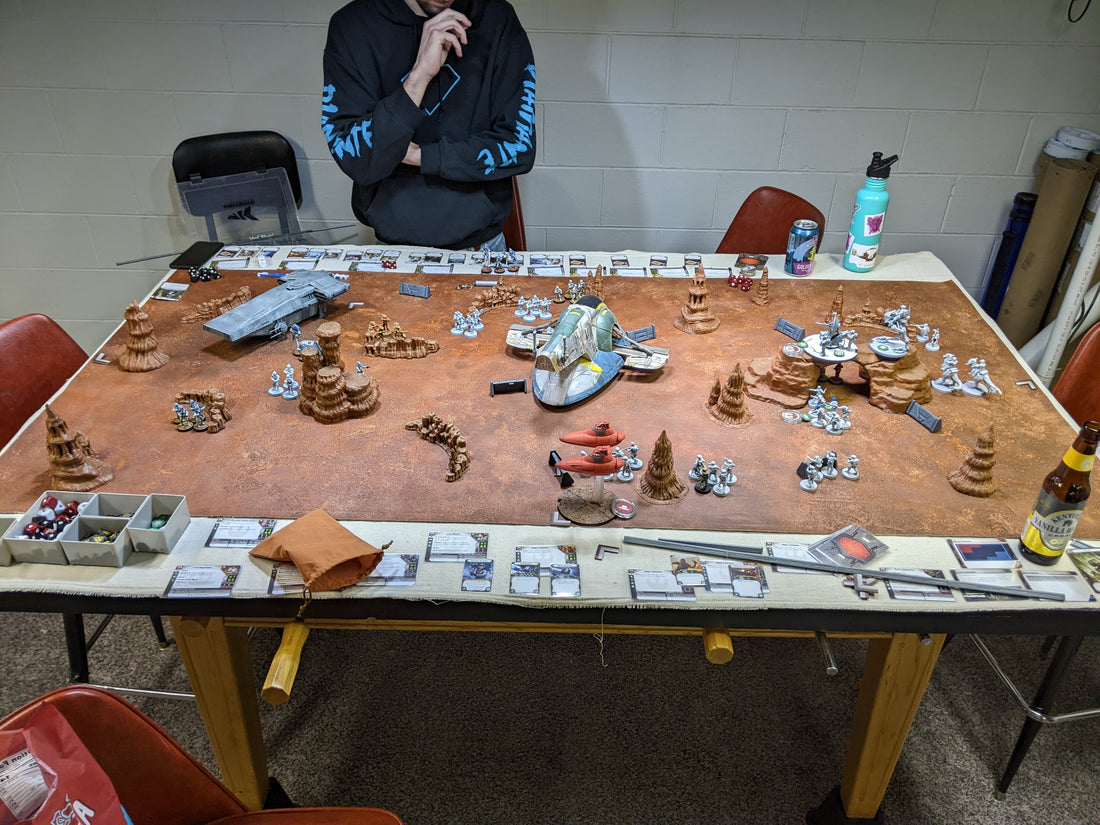
Putting stuff on the mat is literally the first thing I do. I just want to see it full of terrain and models! It’s so exciting!
STORAGE
Storing your mate safely and cautiously will ensure it lasts for a long time! Folding the mat will cause the thick layer of acrylic latex caulking to crack over time, leading to an undesirable aesthetic. So, always ROLL IT UP LOOSELY. Too tight of a roll can also cause the material to crack a little over time. Make sure the interior diameter of the rolled up mat is about 3 inches or more to ensure no undue stress is put into it.
SHARING
Now that you’ve created this BADASS BUDGET BATTLEMAT, please consider sharing this page with your friends and wargaming buddies!
I would also love to see your mats in action! Send me a picture and I’ll post it here on the website!
It means the world to me to get my work out there and help people create memorable experiences at their local gaming stores and basements! Thank you for your interest in my efforts and work!
QUESTIONS AND COMMENTS
Was anything unclear? Did I mspel anthing? Could a step use a little more clarification or a demonstrative picture? Let me know at info@pocketdimensionstudios.com, comment below, or fill out the Contact Form right here on the website!
Also, this is my first blog post and tutorial on the website! If you have any ideas or suggestions for future posts, send them my way or add them in the comments section below!

